CERN Openstack Virtual machines
Dedicated Virtual Machines (VMs) running Windows or Linux are available to the project. They are hosted on the CERN Openstack private cloud. End-users can request the creation of VMs taylored to their specific needs or use pre-instanciated headless or Terminal Server (TS) machines.
Available resources
- 480 CPU cores
- 1.9 TB of RAM
- 8 TB of volume storage
- Up to 20 VM instances
- Up to 8 volumes
- Hosts with NVIDIA V100s GPUs (see here)
General purpose VMs and Terminal Servers
General purpose VMs are pre-instanciated and can be used immediately. To cover a wide variety of use-cases, and to highlight the features of the different hostgroups, three types of machines are made available: Windows Terminal Server running Windows Server 2019 (and therefore allowing multiple users to connect at the same time using Windows Remote Desktop), Linux (CC7) Terminal Servers (capable of running a desktop environment such as GNOME, KDE or XFCE) and Linux (CC7) computing nodes. A detailed description of each machine is provided below and a summary is provided in the following table:
| VM 1 | Hostgroup 2 | Flavor | Description |
|---|---|---|---|
mp-win-ts-01 |
mp/windows |
r2.3xlarge |
Terminal Server running Windows Server 2019 |
mp-linux-ts-01 |
mp/linux/ts |
r2.3xlarge |
Linux Terminal Server running CC7 |
mp-linux-ts-02 |
mp/linux/ts |
r2.3xlarge |
A clone of mp-linux-ts-01 |
mp-linux-ts-steam-01 |
mp/linux/ts/steam |
r2.xlarge |
xxxx |
mp-linux-01 |
mp/linux/node |
r2.3xlarge |
A CC7 computing node running on a r2.3xlarge |
mp-linux-02 |
mp/linux/node |
r2.3xlarge |
A clone of mp-linux-01 |
mp-linux-gpu-01 |
mp/linux/gpu |
g2.xlarge |
A CC7 node running on a GPU-capable host |
Windows VM To-Do
- Windows Terminal Server
- A Windows 2019 VM meant as a Terminal Server with preinstalled software for scientific computing (e.g. Mathematica and Ansys). Multiple users can connect at the same time using Windows Remote Desktop. EOS is mounted as a drive so that users can access their CERNBox or any other EOS project space. The VM has 32 virtual cores and 120Gb of RAM, making it a good choice to run interactive computations or to manipulate large CAD models. Users can also use it as a replacement of the CERN Windows Terminal Server service. More details are provided in the description of the
mp-windowshostgroup. - Linux Terminal Server
- A CC7 VM providing interactive access through SSH or with a desktop environment using FastX remote connections. More details are provided in the description of the
mp-linux-tshostgroup. - Linux computing node
- CC7 VMs supporting interactive access through SSH and meant as computation nodes for scientific computing. More details are provided in the description of the
mp-linux-nodehostgroup. - Linux GPU computing node
- CC7 VMs supporting interactive access through SSH and meant as computation nodes for scientific computing. GPU computations are supported with VMs running on hosts equiped with NVIDIA V100s GPUs. More details are provided in the description of the
mp-linux-nodehostgroup.
To connect to these machines, refer to the documentation section below. More details on the configurations are provided in the next section.
Virtual machine features
The features of the VMs follow the structure of the puppet hostgroups. The structure is hierarchical, meaning that subhostgroup inherits from the configuration of their parent(s).

Machine protection (mp) top-level hostgroup
The machine_protection top-level hostgroup holds the complete Puppet configuration for the project.
- Access and user login
- All users of the
machine-protection-studies-userse-group can login to any of the virtual machine (unless a specific lower-level configuration explicitely restricts the list of allowed users). - Administrator rights (Windows only)
- All users of the
machine-protection-studiese-group have administrator rights on the Windows virtual machines. Additional individual users can be added on demand. - Root access (Linux only)
- All users of the
machine-protection-studiese-group are allowedrootlogin. Additional individual users can be added on demand on non Terminal Server machines.
mp/linux
VMs in the mp-linux hostgroup provide a configuration similar to lxplus: the users home directories are on AFS, the standard development tools are available, EOS and CVMFS are mounted and the HT Condor command line tools are available. Additionnally, a system installation of conda is provided (see features/conda).
- lxplus environment
- The hostgroup uses a Puppet configuration module to provide a similar environment to
lxplus. Users are encouraged to read through the LXPLUS Service documentation to get familiar with the key concepts. - AFS and
$HOMEdirectory - Similarly to
lxplus, the user$HOMEdirectory is mounted to the users' AFS directory. Users familiar withlxpluswill therefore be able to switch to these VMs very easily. In particular, the configuration files (e.g. shell configuration files) will be available. For a portable workflow regarding configuration and home directory files, users are encouraged to have a look at Chez moi. - Local user directory
- A local directory is provided for each user in
/home. Note that this is not the$HOMEdirectory (see above). This is provided to allow each user to have its own personal space on the local filesystem, for example to install additional tools or Python environments usingconda. No particular quota is applied. - EOS
- EOS is available and is mounted on
/eos, similarly to most of the IT-managed machines were EOS is mounted. Users can therefore directly access their own EOS home directory ("CERNBox" directory) but also any project space. More details are available here. - CVMFS
- CVMFS is mounted on
/cvmfs, see here. - HT Condor
- The command line tools to submit HT Condor jobs are available. Users are encouraged to read through the HT Condor Batch documentation as needed.
- Conda
- A system-wide installation of
condais provided. The user guide provides details to setup user-specific environments for Python or other languages or runtimes. - Node and npm
nodeandnpmare available in/usr/bin.- Firewall configuration
- TCP ports 8888 to 8900 are open to allow connection to Jupyter notebook and Jupyter labs, or other user-specific web servers.
- CERN scientific applications (PARC)
- Blabla
mp/linux/ts
This sub-hostgroup is meant to provide a Terminal Server experience to the users: common desktop environments (GNONE, KDE and XFCE) are installed. Remote connection is provided with FastX.
- Desktop environment
- KDE, GNOME and XFCE are available.
- Remote connection with FastX
- Please refer to this section.
- Jetbrains
- The Jetbrains IDE can be installed through the Jetbrains toolbox which is available by default. Users should refer to this guide to configure the toolbox for a local installation of their own tools, e.g. PyCharm.
- Thunderbird
- The Thunderbird mail client is installed. Configuration details can be found here.
- Mattermost
- The Mattermost desktop client is installed. See details on the CERN Mattermost service.
mp/linux/node
These "headless" machines are meant as computing nodes and, at this moment, follow the standard configuration of the mp-linux hostgroup.
mp/linux/gpu
These "headless" machines are meant as computing nodes and, at this moment, follow the standard configuration of the mp-linux hostgroup. They run on hosts equiped with a dedicated NVIDIA V100s GPU.
mp/windows
Generic Windows configuration for single-user VMs based on Windows 10. No specific configuration; this Puppet hostgroup is meant to provide users with Windows 10 VMs on
mp/windows/ts
This configuration provides Terminal Server Windows VMs suitable for a general purpose and scientific computing environment. The VMs of the mp/windows/ts hostgroup are also part of the CMF NSC i mp-ts (CMF_NSC_2386) for the management of installed software.
Requesting a VM
Specific VMs can be requested to support the needs of a particular user or project. When asking for the creation of a new VM, the user must consider two aspects: the VM "flavor" and the VM type (hostgroup). The flavor defines the computing resources available to the VM, for example the number of (virtual) cores, the RAM and the local disk space. It should be kept in mind that the resources available to the project are not unlimited, so in some cases, a flavor with a smaller footprint should be considered.
Virtual machines of the following "flavors" 3 can be instanciated:
$ openstack flavor list

+------------+--------+------+-----------+-------+-----------+
| Name       |    RAM | Disk | Ephemeral | VCPUs | Is Public |
+------------+--------+------+-----------+-------+-----------+
| m2.small   |   1875 |   10 |         0 |     1 | True      |
| m2.medium  |   3750 |   20 |         0 |     2 | True      |
| m2.large   |   7500 |   40 |         0 |     4 | True      |
| r2.3xlarge | 120000 |  320 |         0 |    32 | False     |
| g2.xlarge  |  16000 |   64 |       192 |     4 | False     |
+------------+--------+------+-----------+-------+-----------+
m2.small- An instance with a single virtual CPU. Could be considered for example if the machine is meant to run a small dedicated (web) service.
m2.mediumandm2.large- Those are general purpose flavors which are ideal for single user use-cases, for example to have access to a desktop environment (using FastX) on a dedicated or customized machine.
r2.3xlarge- 32 cores VM with a very large available RAM (120Gb). Suitable for parallel computing needs. This machine also has a large local disk space (320Gb).
g2.xlarge- A GPU-capable VM running on a host with a NVIDIA V100s GPU (see here).
The hostgroup of the requested VM depends on the necessary features, as described above.
When a dedicated VM has been created for a user or for a project, it will be configured and be available in the same fashion as all other VMs in the project. It should also be noted that, unless specifically requested, any user of the machine-protection-studies-users will be able to login (and use) the VM. This is meant to ease the user management.
Connecting to virtual machines
Three different ways to connect to the VMs are available, the user should choose depending on the VM type and configuration and on the intended use case.
Connectin from outside CERN
Connections from outside CERN can be performed using SSH tunneling for SSH or FastX connections to Linux machines or through the Remote Desktop Service Gateway for Windows machines; see details below.
SSH connection
This is the primary way of connecting to the Linux VMs. As the mp-linux hostgroup is configured in a lxplus-like fashion, users can connect following the usual procedure applicable to IT-managed machines. In particular, two SSH credential methods are available: password or Kerberos. It should be noted that connecting with a SSH keypair is not possible (mostly because the home directory is on AFS).
Connecting from outside CERN
Connections from outside CERN can be performed in a variety of ways. The example SSH configuration file below shows how to use SSH tunneling through lxplus using ProxyJump.
Users connecting from Mac OS can refer to this guide and this documentation page. Users connecting from Linux can refer to this guide.
For reference, here is a $HOME/.ssh/config file
Host *
  UseKeychain yes
  Protocol 2
  IdentityFile ~/.ssh/id_rsa

Host *.cern.ch !lxtunnel.cern.ch !lxplus.cern.ch !aiadm.cern.ch !lxplus !aiadm !gitlab.cern.ch
  ProxyJump lxplus.cern.ch

Host mp-linux*.cern.ch lxtunnel.cern.ch
  GSSAPIAuthentication yes
  GSSAPIDelegateCredentials yes
  PubkeyAuthentication no
  PasswordAuthentication no

Host lxplus*.cern.ch lxplus
  GSSAPIAuthentication yes
  GSSAPIDelegateCredentials yes
  PubkeyAuthentication no
  PasswordAuthentication no
  ForwardX11 yes
  ForwardX11Trusted yes
  ForwardAgent yes

Host gitlab.cern.ch
  Preferredauthentications publickey
  IdentityFile ~/.ssh/id_rsa
  GSSAPIAuthentication yes
  GSSAPIDelegateCredentials yes
  ForwardX11 no
SSH is configured so that all connections to a .cern.ch machine will be tunnelled through lxplus. This is very useful when connecting from outside CERN. The connection to lxplus and to mp-linux*.cern.ch (the Linux VMs of this project) are handled through Kerberos authentication. This setup allows password-less connections from inside and outside CERN.
Connecting from Windows
Connection using lxplus tunnelling (preferred)
- Install PuTTY from CMF (or alternatively from here)
-
Open PuTTY and insert
lxplus.cern.chinto "Host Name"
-
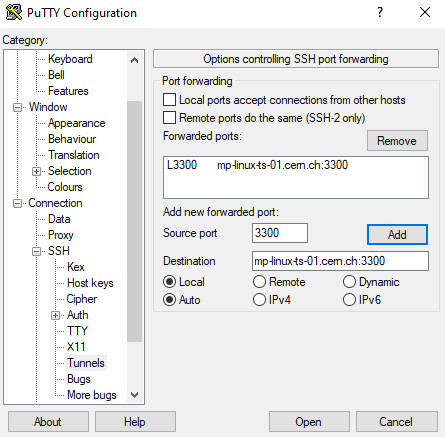
Go to "Connection" -> "SSH" -> "Tunnel"
- Insert 3300 for the "Source Port"
- The VM adress followed by
:3300(e.g.mp-linux-ts-01.cern.ch:3300) in "Destination" - Click "Add"
-
Go back to "Session" (top in the left menu)
- Give this configuration a name (e.g. lxplus_tunnel) in "Saved Session"
- Click "Save"
- Click "Open" to start the proxy. If you reopen PuTTY you can double-click on
lxplus_tunnelto restart the proxy directly - Enter your CERN username and your password in the new window
- Open FastX and add a new connection by clicking on de "+" in the top-left corner
- Select "https" in the top box
-
Enter
localhostin the "Host" field and your CERN username in "User"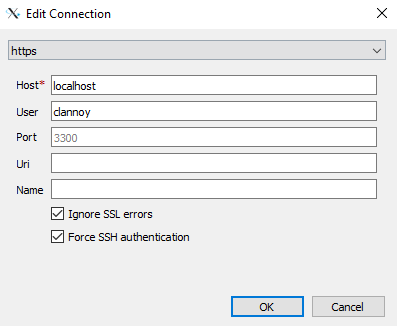
-
You can now connect to the VM outside CERN
Users connecting from a Windows machine can find more details on the use of Putty in this documentation:
- Explanation on how to connect to
lxplusare provided and are also valid to connect to the Machine Protection Linux VMs; - Details are given on how to generate a private/public key pair;
- Apparently Windows 10 has a built-in SSH client, see details on that page.
Details for connections as root can be found in the system administrator documentation.
Connection using Windows Terminal Server
Alternativly you can connect to your CERN desktop via the Remote Desktop Service and from there connect to the VM with FastX. This documentation explains how to configure the remote connection via Remote Desktop Service.
Connect to a webserver from outside CERN
To connect with your browser to a jupyter lab session launched from the VM you need to configure a proxy.
-
Open PuTTY and insert
lxtunnel.cern.chinto "Host Name" (or load your already existing PuTTY session to add a new ssh tunnel) -
Go to "Connection" -> "SSH" -> "Tunnel"
- Add the source port 8080
- Enable "Dynamic"
- Click "Add"
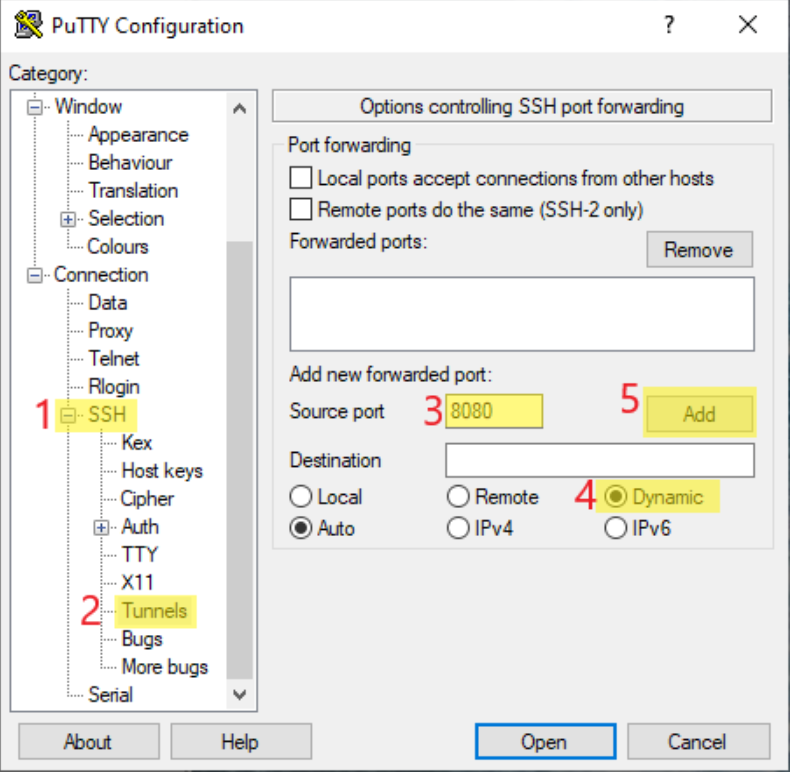
-
Go back to "Session" (top in the left menu)
- Add
lxtunnel proxyas a name - Click "Save"
- Add
-
Click "Open" to start the proxy. If you reopen Putty you can double click on
lxtunnel-proxyto restart the proxy -
Open Firefox and go to
about:preferences -
Search for "Proxy" and click on "Settings..."
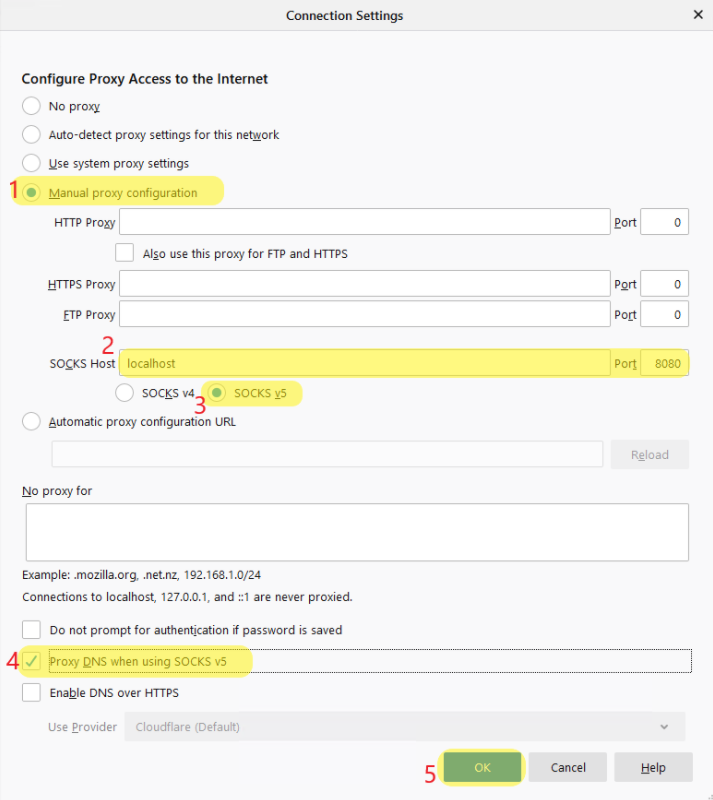
-
Select "Manual proxy configuration"
- Insert localhost for "SOCKS Host" and 8080 for "Port"
- Select "SOCKS v5"
- Select "Proxy DNS when using SOCKS v5"
- Click "OK"
Further documentation is also available here.
Desktop environment using FastX
Although X-forwarding over SSH is always an option, FastX is installed on all the mp-linux-ts-* machines to support interactive access to the installed desktop environments (KDE, GNOME and XFCE). FastX is highly optimized for speed, even over slow network connections, and also provides a "Linux in the browser" feature, in addition to a more traditional desktop client (available on Mac, Linux and Windows). FastX is being deployed at CERN in a pilot phase of the CERN Applications Gateway project.
The FastX desktop clients can be downloaded from here.
Connection using the web client
To connect using a web browser, simply follow these steps:
- Go to https://{machine-name}.cern.ch:3300 where
machine-nameis the host (*e.g.mp-linux-ts-01) - Connect using your credentials with username and password
- Start a new session by choosing your favorite desktop environment (XFCE is a good choice)
- Refer to this documentation as needed
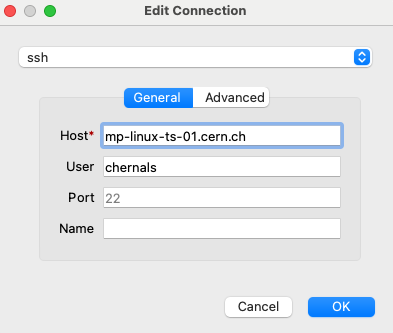
Connection using the desktop client on Mac OS
To connect using the Mac OS desktop client, follow these steps:
- Create a new connection using the SSH protocol (recommended, as it allows tunneling and password-less authentication) as show in the screenshot
- Start a new session by choosing your favorite desktop environment (XFCE is a good choice)
- Refer to this documentation as needed
Connection using the desktop client on Windows
To connect using the Windows desktop client, follow these steps:
- Create a new connection using the web protocol
- Connect using your credentials with username and password
- Start a new session by choosing your favorite desktop environment (XFCE is a good choice)
- Refer to this documentation as needed
Connecting from outside CERN
To connect from outside CERN using the FastX desktop clients, refer to the SSH configuration above, especially the part on using lxplus with ProxyJump. With the connection type set to ssh as shown above, the whole process is password-less.
Windows Remote Desktop connection
The connection to Windows VMs uses the Windows Remote Desktop clients available on Windows and on Mac OS. No specific configuration is needed. Users can use the CERN Remote Desktop Services to create a .rdp file (use the Generate a .rdp file to connect to a Server link). Slightly more detailed instruction are available for:
The general documentation on Windows at CERN can also be consulted.
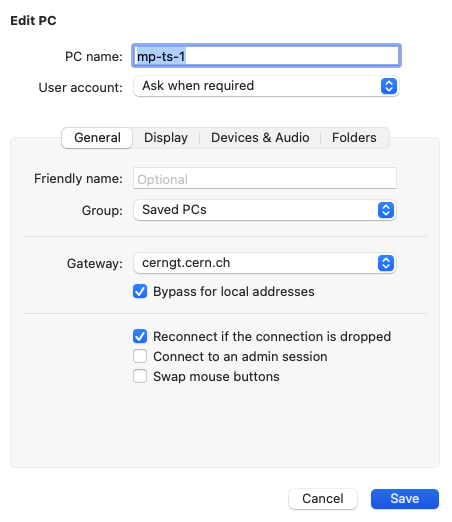
Connecting from outside CERN
The VMs in the mp-windows hostgroup are accessible through the Windows Remote Desktop Gateway (all users in the machine-protection-studies-users are allowed to login through the gateway). Users should use cerngt.cern.ch has gateway when connecting from outside the CERN network (see screenshot below). Alternatively, a .rdp file can be downloaded directly from this page (use the Generate a .rdp file to connect to a PC from outside CERN link).
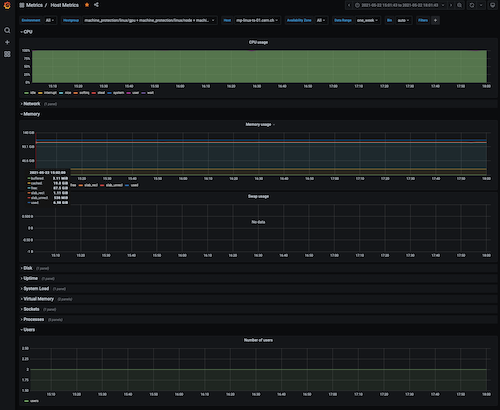
Monitoring dashboard
Grafana dashboards are available here.